Friday, March 30, 2007

A Card for Abby


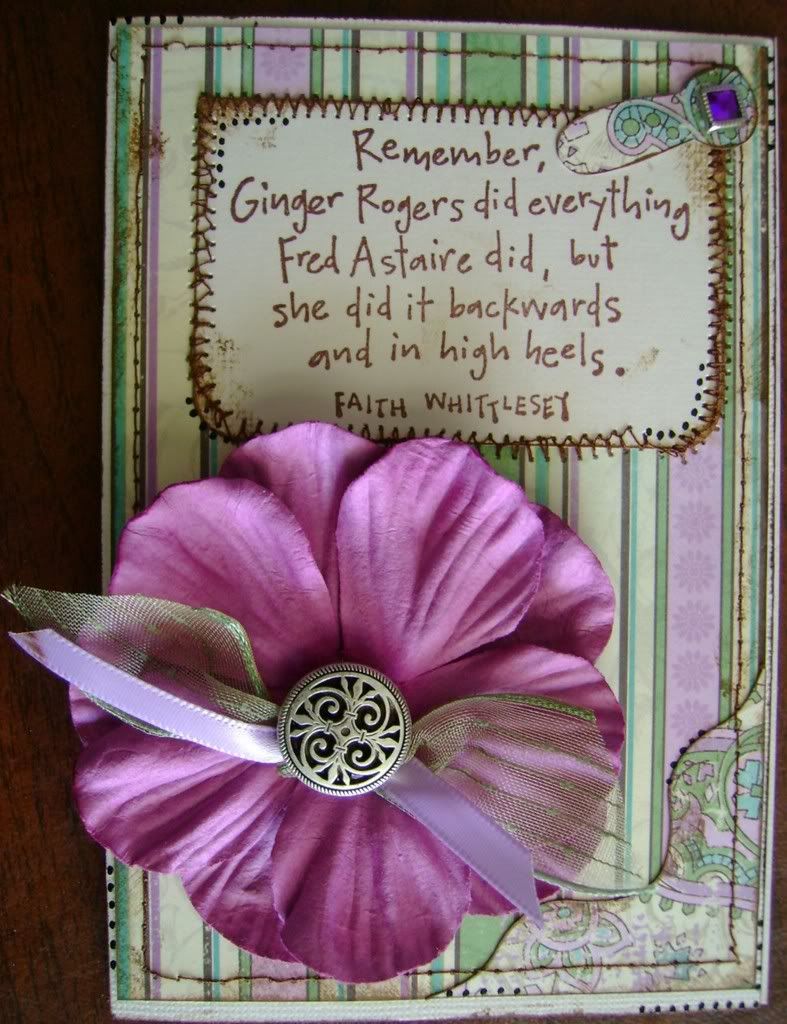
Today is a big day for my 8 year old Niece. She is in Children's Dance Theatre and today is her first performance as a member of CDT. So, I made this card for her. The paper is from Making Memories, and the cardstock base is Bazzill. The photo corner and frame corner were cut with my Cricut. The flower is a Prima, and then I embellished it with some ribbon and a button. The gem on the photo corner (which is actually purple) is a brad from Making Memories. Everything is distressed with 'Vintage Photo' ink and sanded. I stitched with brown thread (and for some reason my sewing machine is not my friend today... I will have to fix it later). The sentiment is from a stamp I picked up this morning.
I dropped this card off to her with a nice flower arrangement, and she was very excited!

Thursday, March 29, 2007

Wedding Card


Today is Danielle's Wedding. Her wedding colors are Lime Green and Navy Blue, so I wanted to make her card in her colors. Here's what I made for her. I cut the hearts with a cuttlebug die. The lace came from Making memories as did the washers that say "Enjoy" and "Happiness". Everything has been distressed with ink and sanding. The bottom is a home made rub on that says "Best wishes as you begin your new life together."


I hope they like it, and I hope they have a wonderful wedding day and life!

Wednesday, March 28, 2007

Card Exchange

I signed up for a card exchange. I have to make 10 cards, mail them in and I will get back one of each person's home made card. I am really excited for this, and think it will be fun. (I know, I need therapy... well MORE therapy...) Anyway, this is the card I am making. I hope everyone likes it. I used paper from Making Memories and the brad in the center of the flower is also from Making Memories. (YAY for the BIG sale!). The flower is from a flower bunch I bought at Michaels and dissected. I distressed everything with 'Old Paper' ink, and stamped the sentiment from an old D.O.T.S. stamp. The ribbon I think came from Michaels. And of course, I stitched on it, since that is my latest craze.

My OCD Box

This is my little OCD box. For christmas one year my mother gave me a gift card to Sur La Table (I LOVE to cook). And it came in a little box that I became slightly (ok, more than slightly) obsessed with. I dissected it and taught myself how to make them. This is the front of the last one I made and decorated.
This is the back of it. I cut out the heart and tag with my Cricut. The eyelet came from Making memories, as did the papers.
This is the insert card. I love this box because you can put a card in it and it stands up nicely in the box folds. They are great for gift cards and invitations, and thank you notes with little gifts or treats.
Here's the card next to the box.
Here's the card inside the box.

Thanks for looking at my crazy OCD box. :D I think I will make another one today... after I get back from the greatest sale on earth!

Monday, March 26, 2007

Oh Baby!


My neighbor is pregnant with her first son, so I thought I would make her a baby card. Here's the card I made. The paper is from Die Cuts with a View Spring Stack, and I distressed it all with ink and stitched it together at the top. I thought after I made it, that it needed something else so I added the brads from Queen and Co. The tag and letters were all made with my Cricut.

Saturday, March 24, 2007

Get Well Card

I had this green cardstock and was trying to think of something to make with it, then I saw this cute apple on one of my Cricut cartridges. So here it is. The inside says "Hope you feel better soon!". I layered the background papers and added some ribbon and stitching. Lots of distressing with ink. The tag I printed out on my computer.

Friday, March 23, 2007

Back in the saddle again....

I have been so busy lately I haven't made any new cards. Tomorrow is a bridal shower for my ex-neighbor so I made this one for her. The inside says congratulations. It's a 4x6 card that I distressed with ink, then stitched on ribbon and another piece of the same paper but the reverse side up. I made a home made rub on for the sentiment and used a Prima Flower with a brad from making memories. I hope Dani likes her card and her gift tomorrow.

Wednesday, March 21, 2007

Here ya go Kristi!


My friend has been asking me to make her a card, and so I did. I just couldn't post it until I had actually given her the card I had made for her.
This is it.
I used my Cricut to cut out the photo corner and the tag that says 'Friendship Blooms'. The actual sentiment was a home made rub on. The picture hangers are from Daisy D's, and the flower is from Making memories.
There's quite a bit of distressing and a little stitching on it. I am loving stitching layers of paper together!
I hope she liked this card, I thought it turned out cute and springy!

Sunday, March 18, 2007

The Missing Birthday Card

This is the card that I had made and misplaced. It was cleverly hiding next to my computer disguised to look like a birthday card.

This card is 6x6 and has quite a bit of distressing on it. I stitched on the yellow polka dotted paper to the brown paisley cardstock, and then stitched on the blue ribbon. The flower is made from cutting out petal shaped tags with my Cricut. Then I made loops on top of the petals with ribbon to give it some more texture and dimension. Topped that off with some circles cut again with the Cricut, a swirl eyelet on top of that with a little ribbon. The sentiment is a home made rub on.

Saturday, March 17, 2007

What I did yesterday


Yesterday was spent making 90 of these little babies. Wow. I printed out the white card on top using the 'Entebbe' font (I love that font right now), then cut them, rounded just the bottom corners and distressed the edges with 'Old Paper' distressing ink. Danielle's colors for her wedding are Lime Green and Navy blue, and on such short notice this was the closest thing I could find to her colors. So the next layer is a piece of chatterbox paper stitched to the white printed cardstock. I then glued that to a piece of solid navy blue cardstock, punched a hole with my handy Crop-A-Dile (Thanks Dawn) and ran some ribbon through it. I wanted to add a flower to it, but prima's are pretty darn pricey for something that is probably going to be just thrown out so I went to Michaels and bought a little flower bunch and trimmed them all off the stems and adhered them with Zots. I hope she likes these.

Thursday, March 15, 2007

Losing a card sucks....


Last month I made a Birthday Card... and when I needed it... it was gone. I looked high, I looked low... and I couldn't find it. So, I had 15 minutes to whip up a replacement card and this is what I did. I printed out the sentiment and cut it with a paper punch, then inked the edges. I stitched a little paper together, added a ribbon and a brad from Queen and Co and I had a birthday card.
Phew.

Wednesday, March 14, 2007

Happy Birthday to my Nieces!

I am surrounded by boys. I have two boys, and between my sibling I have 9 nephews and only 4 nieces (on my side of the family), so when I get to make cards for my nieces I get a little excited. For Alisa's card, I found an old Target Advertisement that I used to create the shape and color palette for her card. the brads are from Queen and Company, and the letters I cut out with my Sizzix, and layered the patterened paper on top of 5 cuts with black cardstock to make my own chipboard. I then put a glaze over the letters to make them look like they are shiny plastic. Added a little ribbon and some stitching, and printed out the Happy Birthday from the computer.


For Dani's Card I used a Cuttlebug embossing folder to texture the background, then used my Cricut to cut out the flowers and the tag. I sanded the edges of the flowers and inked the edges of the brown cardstock. I also sanded over the background paper after I embossed it to make the embossing pop a little bit more. I added some ribbon and some stitching, and finished it all off with some Stickles to give it a little 'bling'. I hope they liked them.

Tuesday, March 13, 2007

Birthday Card


Another monogram card. I really like these, they are easy to make and look really pretty when they are all done. Once again I used my Cricut to cut out the B, it's shadow, the photo holder, and the circle. The H is an eyelet from Making Memories as is the round eyelet in the circle. Everything is distressed and I am LOVING stitching on cards, as you can tell. Instead of making a tag this time, I just 'floated' the tag rim around the circle and placed the circle on a pop dot to give it some layers. I really liked how this one turned out.

Dawn's Exploding Box

So, my 'Sister', Dawn asked me to make her an exploding box last month. Now, I would climb mountains for Dawn, they'd be small ones, but I would climb them. :p So here is the box I made for Dawn. It's a little bigger than the first one I made, and I think I am happier with this larger size. The 'D' on top was cut with my Cricut, but I layered it about 6 times to make it seem like chipboard and then I distressed it. The tag is another tag made with my Making Memories Tag Maker.

Yeah man, that's cool. Dang. (A little joke for Dawn)

Monday, March 12, 2007

Just Because


My Mother in Law went out of town the beginning of January, and as of today still has not returned. (Good for her! If I could run away for the worst part of winter I think I would too!) Anyway, I was thinking about her a lot last month and so I made this card for her. The 'B' and the little photo holder are both cut with the Cricut, and the tag I made with my Making Memories tag maker. I did quite a bit of distressing and a little stitching to give it some texture and added ribbon. The flower eyelet is also from Making Memories as is the paper.

Sunday, March 11, 2007

Happy Birthday Leslie


So, tomorrow is my sweet neighbor Leslie's birthday, and she is SO TALENTED that I am very intimidated to make anything for her, but I also know that I have to MAKE the card I give her. So, here goes.
The Flower is Prima, and I made the tags. The first tag is a transparency sheet and cut with my sizzix. The second tag is chipboard, also cut with my sizzix. The paper is from Die Cuts with a View Spring Stack, and it was all stitched together and distressed. The color scanned in all funky on the tag, but that paper is the same color as the top stripe of the card base. Hope she likes it.


So, I was in a slump and decided to make a friendship card. This card was pretty simple and really doesn't need any explanation. It turned out a bit more masculine than I was hoping, but I still think it's ok. Not my best work, but it's not my worst either.

Saturday, March 10, 2007

Birthday Card


So Cricut right now has a contest where you enter something you made using your Cricut, and if your project is selected you win a free cartridge.
So this was the first card I entered to try to win, and while I didn't win, this card did get mentioned in the weekly newsletter, so that made me happy. The only parts of this that aren't Cricut related are the corrugated paper in the back, the wire that I tied from the balloon to the hippo's tail, the ribbon, and the background polka dotted paper that I ripped and stitched. All the shapes were cut with the Cricut, and I inked them. The sentiment is once again, a home made rub on.

Baby Card

So, my neighbor came home from the hospital today after having a little girl. So, here is the card I made for her. The outside is very simple, I used Daisy D's picture hangers to tie the card together in the center. The card is 5x5. I layered two papers on cardstock and stitched them together, and inked the edges.


The inside has a tag cut with my Cricut layered with vellum and a home made rub on for the sentiment. The brad is from Making Memories.

Thanks So Very Much

My oldest son is 7, and one day as he was leaving school one of the School Secretaries gave him a small gift (since he had a particularly good day at school that day). This small action made him so very happy that I had to thank her. So, this is the card I made for her. I cut the 'T' and the tag with my ever-faithful Cricut. I then layered Papers and inked the edges of everything and sanded the paper to age it a bit. I added a ribbon and did some stitching. The sentiment is a home made rub on (I will explain those later, in another post). I make a lot of those rub ons, so I can have the sentiment I want, in the font and size I want without having to torture people with my horrid handwriting, or spend loads of money and time trying to find just the right stamp. (Although I have lots of stamps too, and I do love them).

The inside (Another home made rub on) said "One small act of kindness can make a huge difference, Thank you."

My First Exploding Box

So, for those who know me know that I love to make things with paper, especially cards and boxes, and that I also LOVE to cook. I have been taking cooking classes from the wonderful Marguerite Henderson. Well I saw this box and wanted to make one. So, since Marguerite was about to become a grandmother for the first time (Well, now she has 2 grandchildren since her daughter had beautiful twin girls) I thought I would make the box for her. I thought it turned out cute, and she was pleased (at least I think she was) when I gave it to her. I hope she enjoys it and fills it with pictures of her beautiful granddaughters.

Valentine's Day Card Class Part 2

This card I made at 4am the day I was going to show the cards to everyone at church. It is a result of pure insomnia. :p This was however, the most difficult card I did for this class. Although it is still pretty simple to make. I used patterned cardstock and inked the edges. Then I used my Cricut (another tool I LOVE) to cut out two hearts and two circle tags. I inked the edges of the shapes. Ran ribbon through them and on the heart added a ribbon charm from Making Memories. The sentiment is a stamp. Then I attempted to stitch around the card, but it seems that sewing at 4 am is not my best work. ;) There was another card, but the pictures I took of it were terrible. Someday I will see if I can remember to scan it in. As always, thanks for looking!

Valentine's Card Class


In January I was asked to teach a Valentine's Day card class for my church. Most of the ladies I would be teaching had never made a card before, so I had to keep it pretty simple. I also wanted to have a couple different styles of cards, a little something for everyone.

So this one is a very masculine card. The brads are from Queen and Co. (I love their brads.) The cardstock is all from Bazzill. I embossed the gray cardstock with a cuttlebug embossing folder, then stitched it on to give the card a little color. The inside had another gray piece stitched on so you could write a note. It was very simple, but still looked very nice.


This card uses a white cardstock, with two different patterned papers layered and then a simple ribbon to separate the papers. I then used another patterened paper that was from the same family of papers and a piece of vellum to make the tag with a Making Memories Tag maker. The tag paper is also embossed with a cuttlebug embossing folder. This was a really quick card also.


Friday, March 9, 2007

Thank You card


So yesterday I needed a thank you card for my neighbor. I took about 15 minutes and here is what I came up with. Hope you like it.
I used paper from th Die Cuts with a View Spring stack, and a Prima Flower. I cut the tag with my ever-faithful Cricut. Did a bit of inking and stitching to give it softer edges and texture. The eyelet is from Making Memories and then I added ribbon. The sentiment is from a CuttleBug embossing folder, then I inked it to make the sentement 'POP' a bit more.

So here it is....

My friends have been asking me to make a place to post all of my creations. (No, not monsters.... yet) So if I can keep up I will start posting them all here for people to see. Hope you enjoy them.